Multi-unit orders in Quipt are handled differently than regular single piece orders. Single piece orders normally fall into the “Pack” section, meaning that the items are ready to be packed and labels have been generated. Multi-Unit orders on the other hand are a more manual process, and require labels to be manually generated (unless you have set up master box information during SKU setup, in which case this process can be more automated).
Step 1: Once logged into Quipt, navigate to the Orders tab.
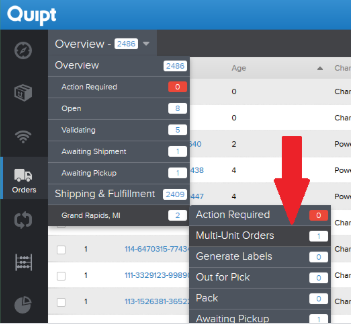
Step 2:. From here, you will want to click the small down arrow next to “Overview” in the upper left hand corner.
Step 3: Under the “Shipping & Fulfillment” section, hover over your warehouse location and then you will see “Multi-Unit Orders” box, click this. It will also show you the number of items that are in the section.
Step 4: Once clicked, you will be taken to the multi-unit section where you will see all orders containing more than 1 quantity which have not had labels generated. Click on the line item to open up the drawer and see the order details.
Step 5: From here we can determine how we want to handle the order, we have a few different options.
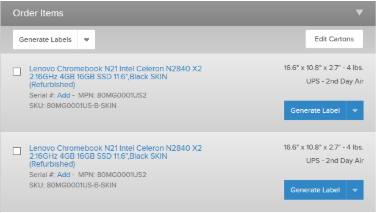
- Option 1 (Ship Units Separately): You would want to select this option if you know that you cannot combine the units in a master box and want to ship the units individually with their own shipping labels. To do so, click the gray “Generate Label” button to generate the labels for the order. From here, the order will go into pack status as usual and provide individual labels for the shipment.
- Option 2 (Combine Units in Master Box): This option would be preferred if you know that you can ship the units in a single box or multiple master boxes.
- Step 1: Click the gray box in the drawer labeled “Edit Cartons”
- Step 2: From here, you are able to select all of the units you would like to include in a single box. Keep in mind that you could do multiple master boxes if you desired. (ex: you have a 4 piece order and want to ship 2 units per box, you could select 2 units and combine those, and then select the other 2 units and combine those as well)
- Step 1: Click the gray box in the drawer labeled “Edit Cartons”
- Step 3: Once all of the units are selected here, click the gray box that will appear labeled “Combine Cartons”
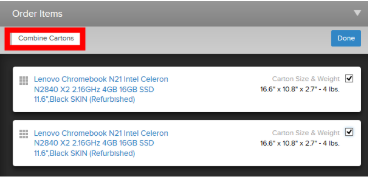
- Step 4: Once combined, you will click the blue box labeled “Done”.
- Step 5: From here, if you have more units to combine into different boxes, you would click “Edit Cartons” again and then repeat the steps from earlier, otherwise, you can now generate the labels for the order by clicking the white “Generate Labels” button.
- ***Additionally, if the dimensions you are seeing are not accurate you are able to click on them and update the shipping dims/weight of the package.
Comments
0 comments
Please sign in to leave a comment.